

Pathway Arches
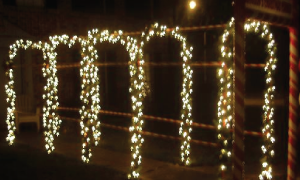
We don’t have photos of these being built but you can see the finished project below:
Why did I (Ryan) make these?
– Store bought arches just don’t look right, and they don’t stand up to the elements.
– I don’t like bending PVC. It works for large areas (driveways), but not for walkways.
– I wanted something that looked as good in the daylight as they do at night.
– I wanted something solid.
– I’m like everyone else here and needed a project for the down time to keep my “Holiday Hobby” going strong!
Supplies Needed:
End Arches:
10 foot length of 1½” PVC tube/pipe- Qty of 2 for a total of 20 feet.
1½” PVC 45 degree angled pieces- Qty of 4
1½” PVC “T”- Qty of 5
Middle Arches:
10 foot length of 1½” PVC tube/pipe- Qty of 2 for a total of 20 feet.
1½” PVC 45 degree angled pieces- Qty of 4
1½” PVC “Four Way +”- Qty of 5
Horizontal Support Pieces:
10 foot length of 1½” PVC tube/pipe- Qty of 3 (to make 5 supports per span)
1½” 3M Blue Painters Tape
1 can of plastic spray paint (one can of paint will cover 2 arches)
Sandpaper (fine)
9 foot artificial garland- Qty of 2 per arch
24 foot 100 bulb mini light string- Qty 2 per arch
10 foot ½” rebar stake- Qty of 2 per arch
ASSEMBLY:
Optional step: Sand any lettering off of the pieces. This won’t really matter as you will not see the printing unless you really look for it.
1. Cut 10 foot PVC into 5 pieces:
– Qty of two 3 foot pieces
– Qty of three 1 foot pieces
(NOTE: These directions will create a 42” wide arch. If you have a wider (or more narrow) walkway, simply make your top pieces longer. All other measurements would stay the same.)
2. Place one three foot piece into the “T” (for end arches) or the “+” (for middle arches).
3. Place second three foot piece on top of “T” or “+”.
4. Put a “T” or “+” on top of the second three foot piece.
5. One foot piece next, with 45 degree piece on top.
6. Second one foot piece, with second 45 degree piece on top.
7. Place final one foot piece.
8. Repeat for the other side of the arch.
9. Connect with “T” or “+” depending, at the top of the arch.
10. PVC cement all pieces together (be sure you have the openings on your “T’s” and “+’s” going the same/correct direction before cementing!).
11. Spray paint evenly over the entire arch.
12. Drill small hole in bottom of arch (1 foot from bottom).
13. Attach garland to hole at bottom of arch and begin winding around arch. You will see red through the garland. Don’t worry about it, that’s why you painted them red. If it really bothers you, get longer garland and wrap it tighter so you don’t see any of the red PVC. Be sure to leave the openings on your “T’s” or “+’s” open.
14. Wrap mini lights around the garland. Connect the two at the top of the arch.
Done!
Horizontal Support Pieces:
1. Each piece should be cut to five feet. If you have a shorter walkway or want more arches, make them shorter. The supports are necessary to help with sway, wind, and they just look good!
2. These need to be sanded lightly to remove the lettering that is printed on all PVC pipe. You will see the lettering on these if you don’t remove it!
3. Wrap your cut pieces with blue painters tape to create a “candy cane effect”. Make them even. You can also get creative and make some thin lines, as well as thicker lines, much like real candy canes.
4. Spray paint your pieces evenly.
5. Allow them to dry, and then peel off the tape.
Done!
SET UP IN YOUR DISPLAY:
Hammer the rebar into the ground and then place the arch over it. Drive 1 foot of the arch into the ground.
Connect your arches with the support pieces. You can run your wiring throughout the supports if you choose to hide your wires. Or you can leave each one on its own plug to run each one on its own channel (for animation).